Disclaimer
Because we don’t develop, ship or maintain these email clients, we are limited in the support we can offer for them.
Like all technology, email apps eventually get too old to handle modern security standards. Because our hosting platform is kept updated to keep your data safe, very old apps might stop working correctly.
If your mail has stopped sending or receiving, you can try:
-
Updating your software to the latest version if possible.
-
Switching to a free, modern app like Thunderbird.
-
Using Webmail via your browser for instant access.
If you have no other choice, you can use the "Non-SSL/TLS" settings found in your cPanel "Email Accounts" section. This usually gets old apps talking again, but please be aware it is a less secure way to connect.
General Settings That You'll Need
To set up your email client on your desktop system, you can use the general settings below to connect to the server.
Incoming Server mail.yourdomain.co.nz
IMAP Port 993
POP3 Port 995

Outgoing Server mail.yourdomain.co.nz
SMTP Port 465
It is important that you use authentication when using IMAP, POP3 and SMTP.
Your account’s information will be similar to this:
Username user@yourdomain.co.nz
Password Use the email account's password
If you are unsure about these settings, feel free to reach out to our team at support@myhost.nz and include the name of the domain you have your emails with.
Outlook (Classic)
If you need help setting up your email client, visit Microsoft's support for Adding an email account to Outlook or contact Microsoft support.
If you need to just update your Email Client settings after being migrated to MyHost skip to step 7.
- Open Outlook
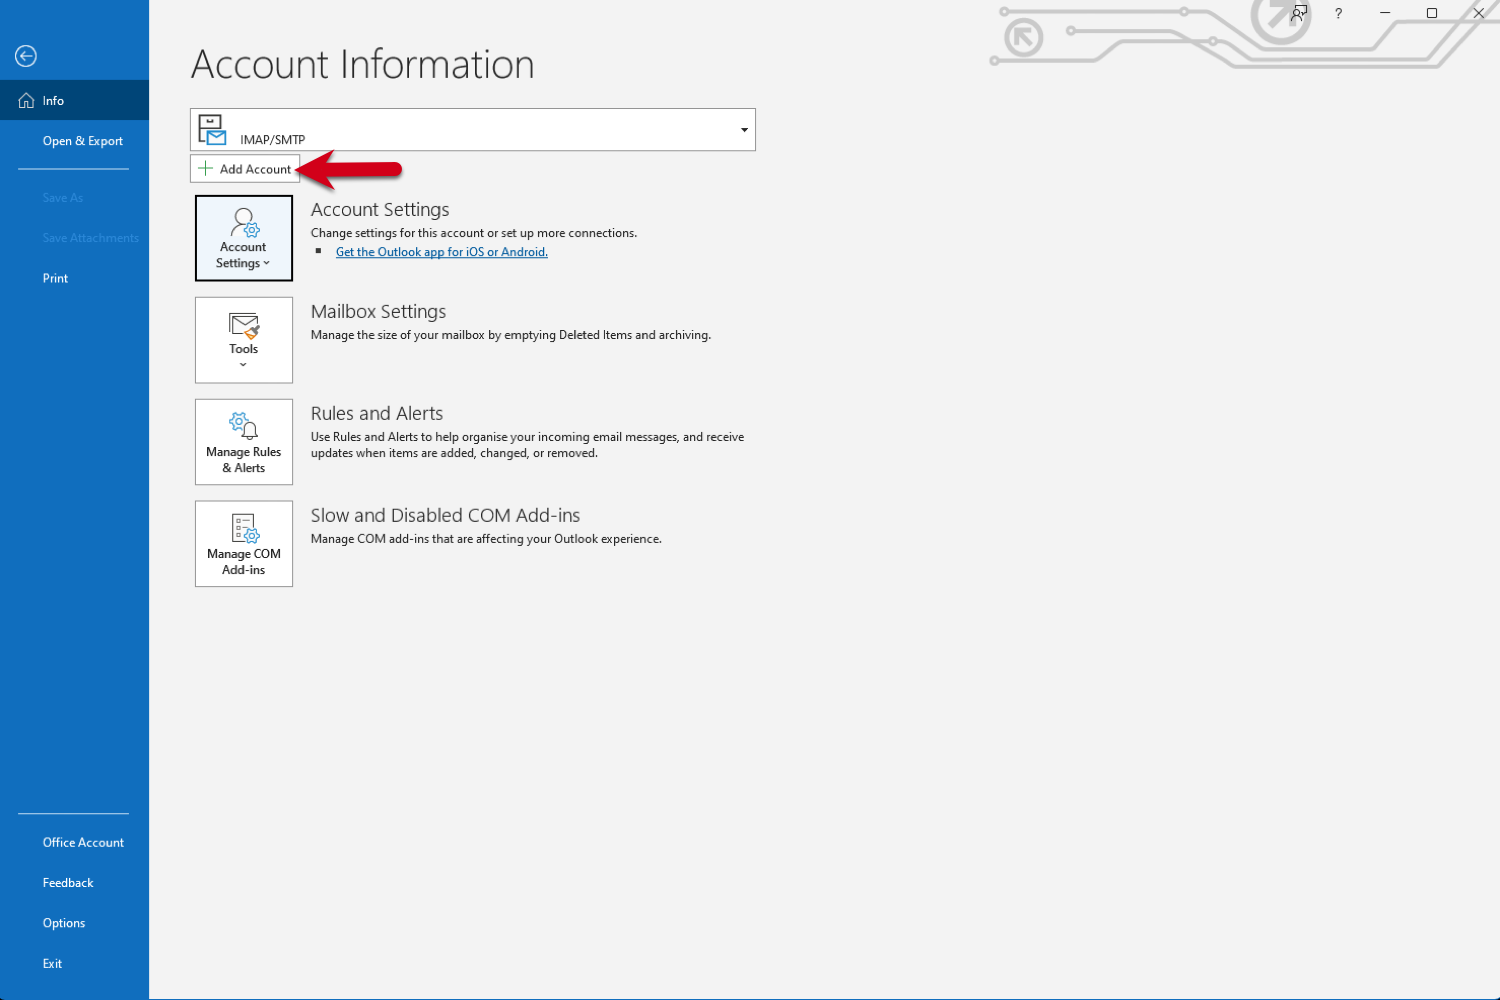
- Click File in the top left corner
- Click Add Account on the start up screen
- Enter your email address
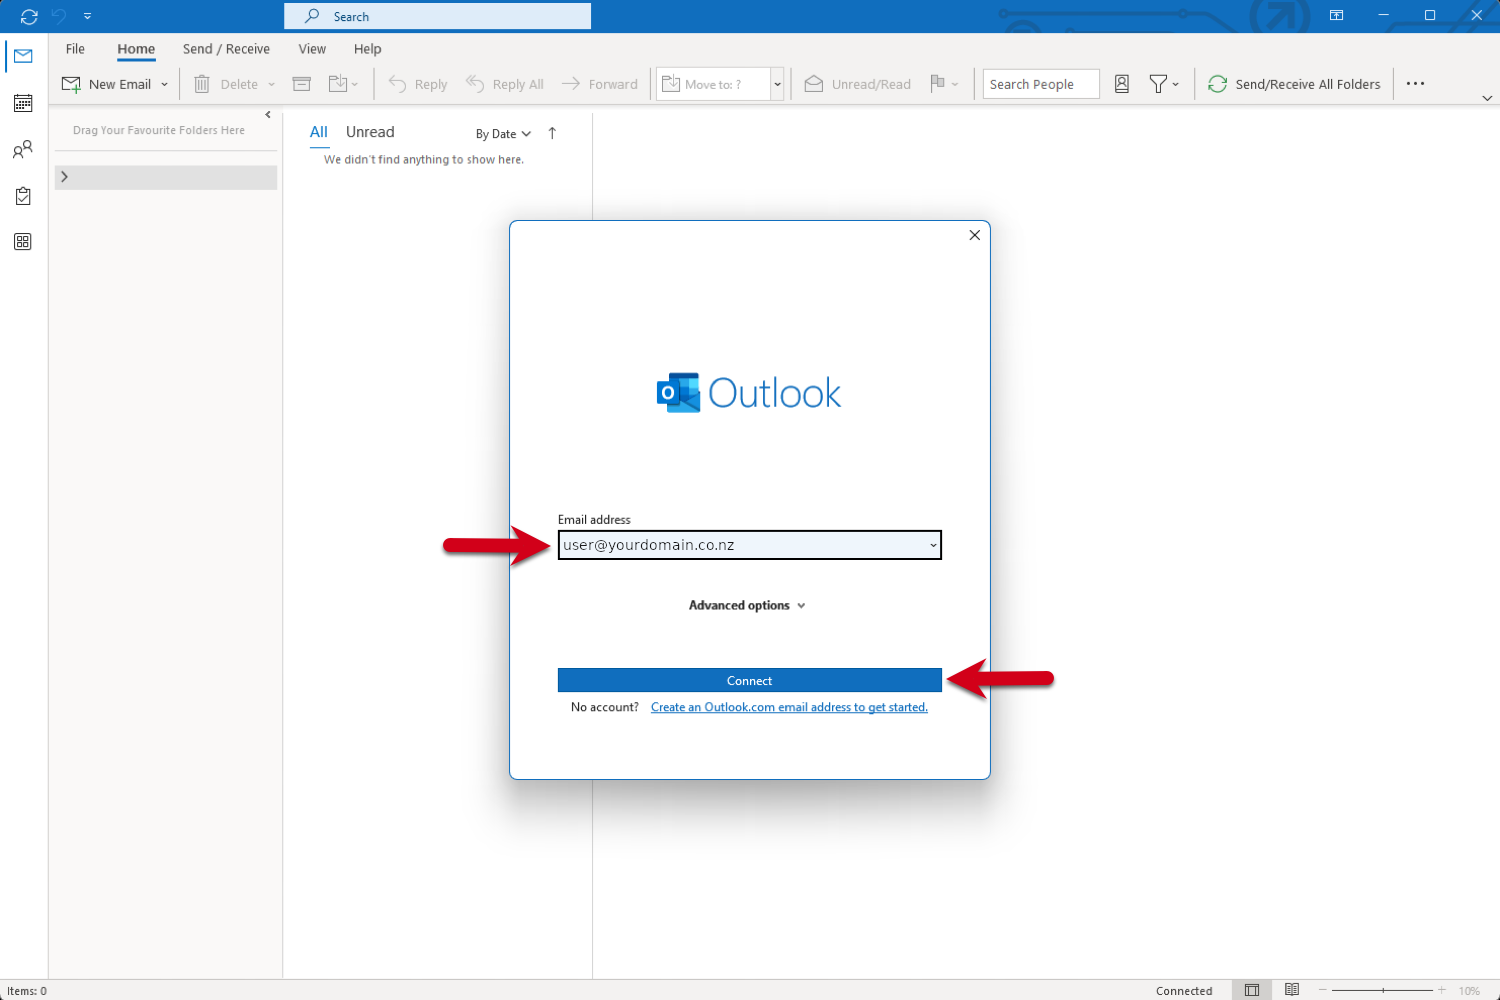
- Enter your password and click Connect to continue
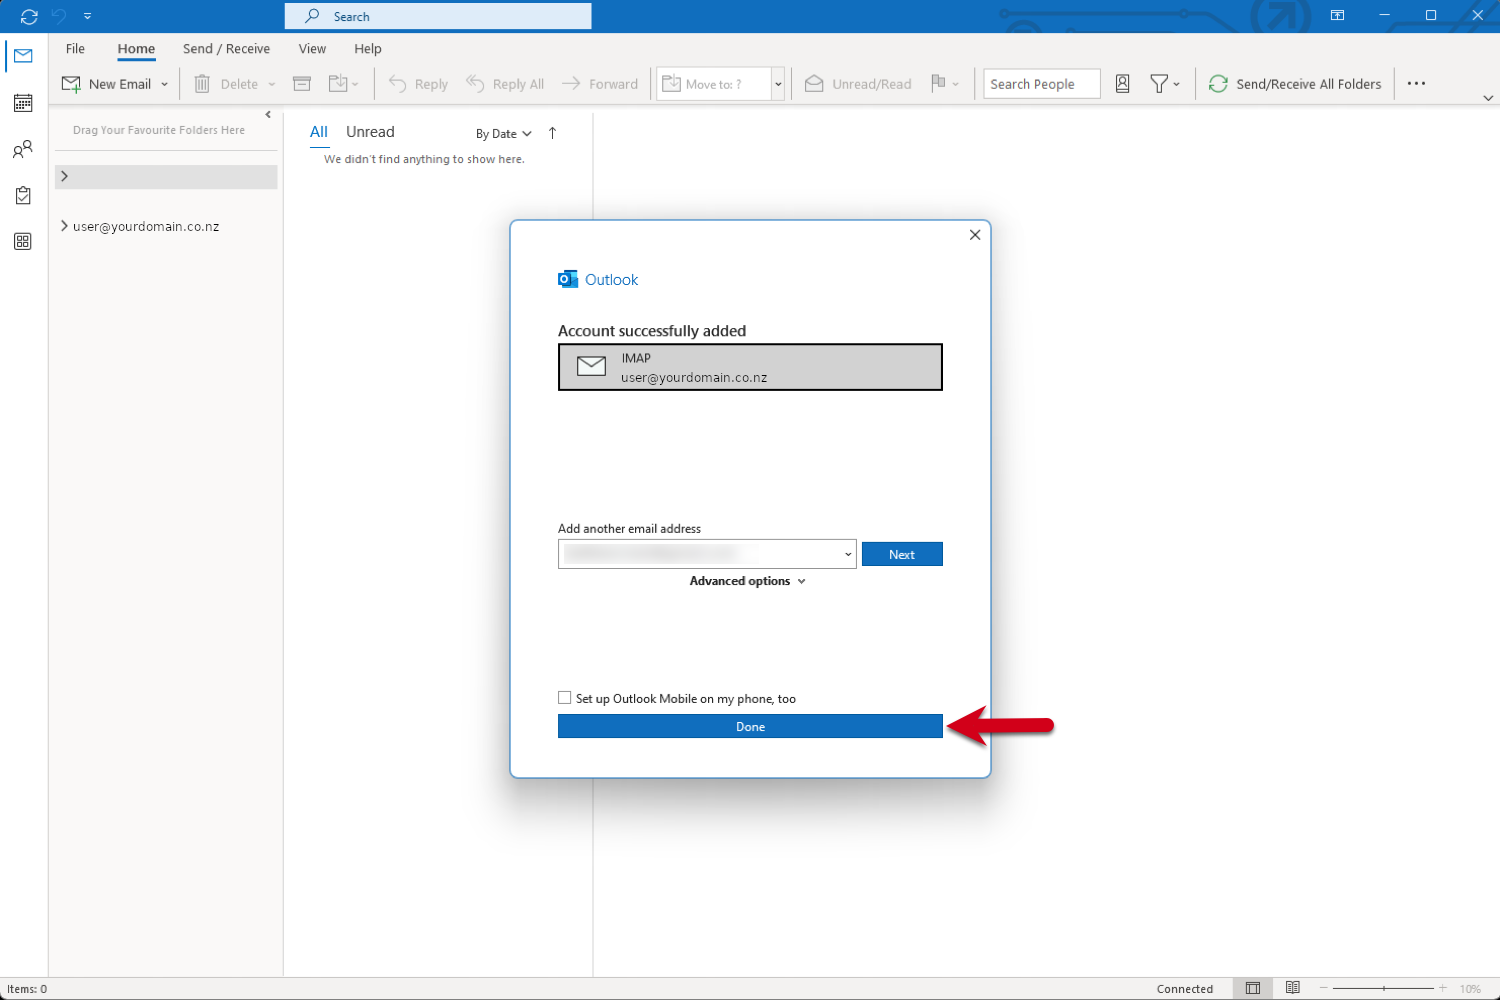
- Click Done to complete the setup
- Go to back File
- Select the email you want to check the settings and click Account Settings, then click Server Settings in the drop down box
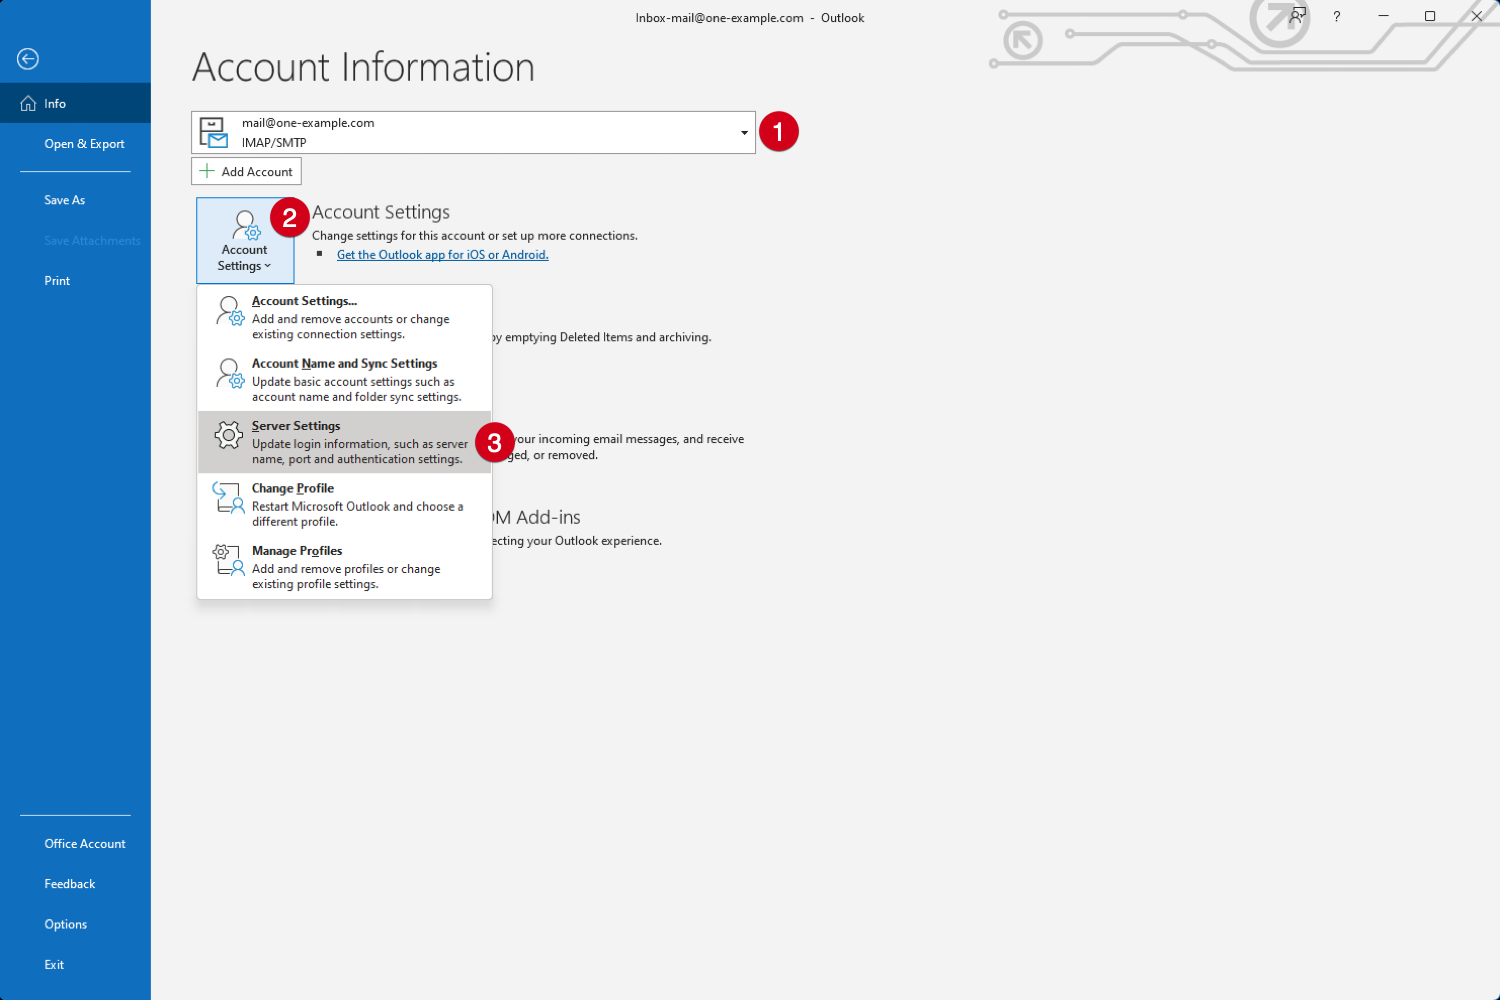
- You can then enter your details for your Incoming mail settings
- Username: Email Address
- Password : Use the email account's password
- Server: `mail.yourdomain.co.nz`(make sure you edit this to have your domain)
- Port: 993 for IMAP, 995 for POP3
- Encryption Method: SSL/TLS
- Make sure Require log-on using Secure Password Authentication (SPA) is unchecked
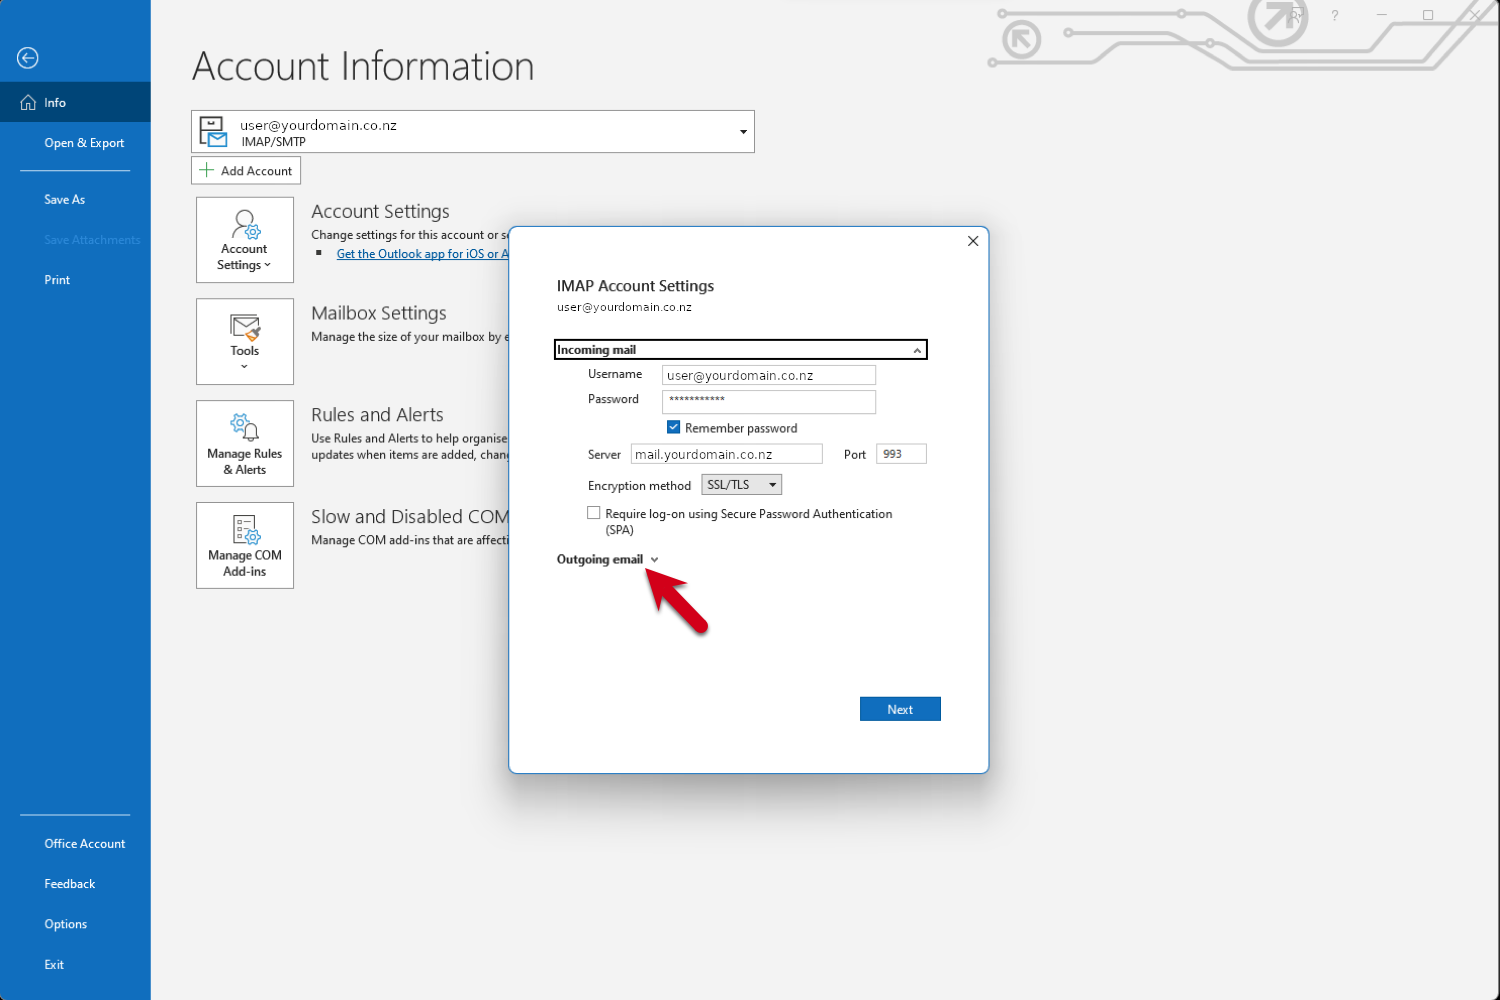
- Click on the arrow next to Outgoing Email to expand it, and double check your outgoing mail settings are correct
- Server: `mail.yourdomain.co.nz`(make sure you edit this so it contains your actual domain)
- Port: 465
- Encryption Method: SSL/TLS
- Make sure Require log-on using Secure Password Authentication (SPA) is unchecked
- Enable My outgoing (SMTP) server requires authentication and check Use same settings as my incoming mail server
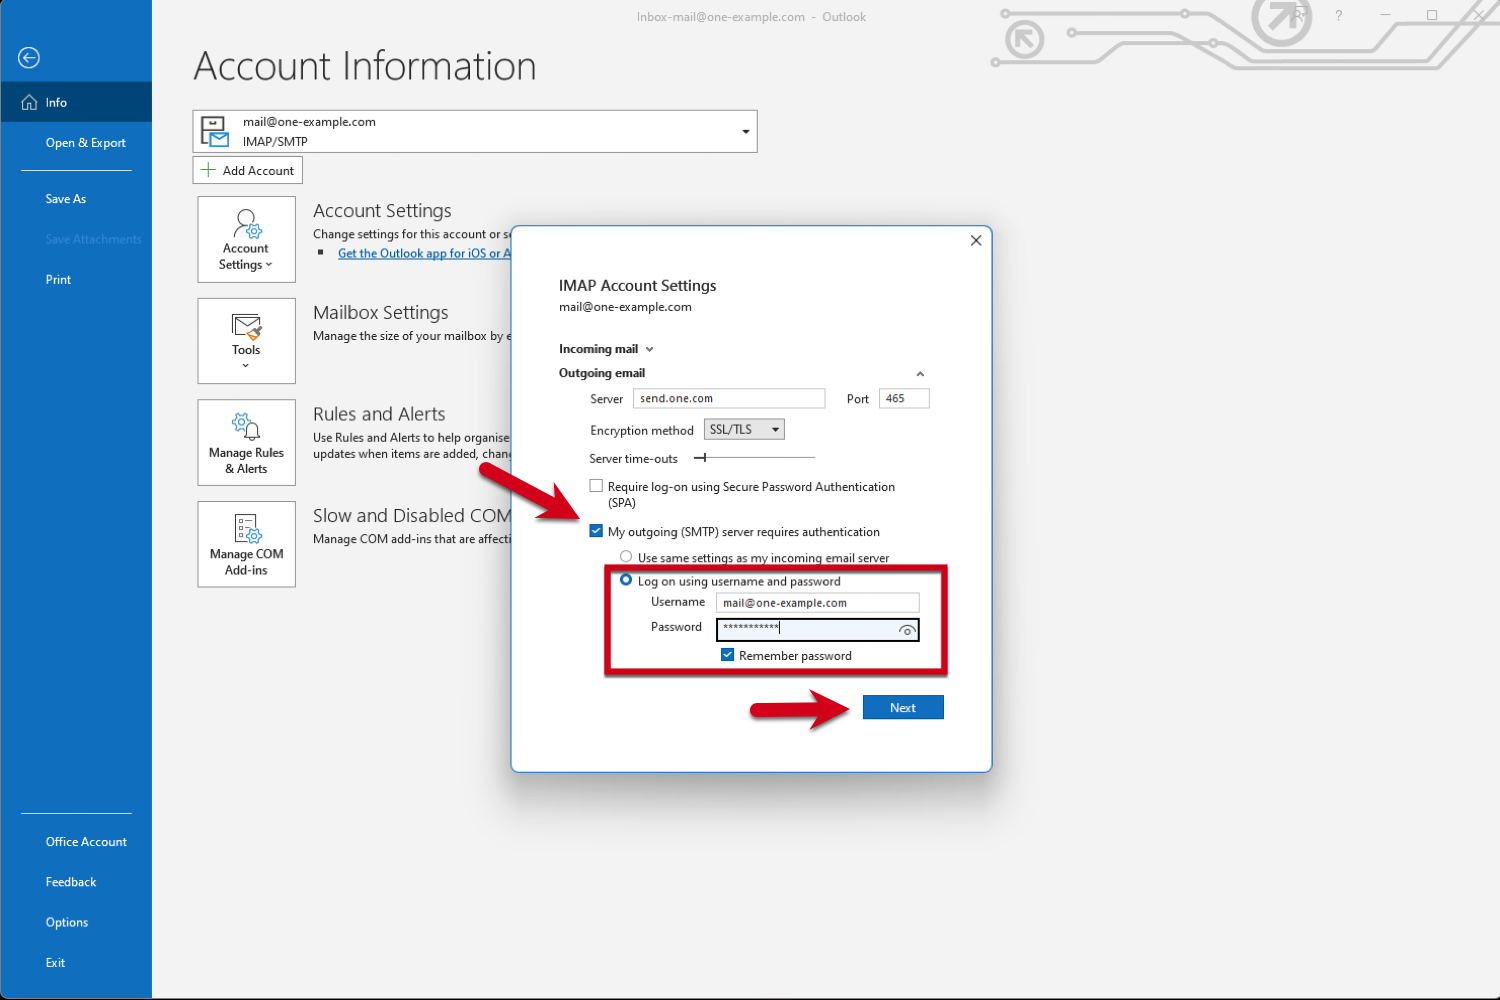
- Click Next and if you don’t have any errors click Done
Outlook (New)
If you need help setting up your email client, visit Microsoft's support for Adding an email account to Outlook or contact Microsoft support.
If you need to just update your Email Client settings after being migrated to MyHost skip to step 8.
- Open Outlook
- If the Welcome screen does not appear, click the Settings icon in the top right
- Under Accounts, click Add account
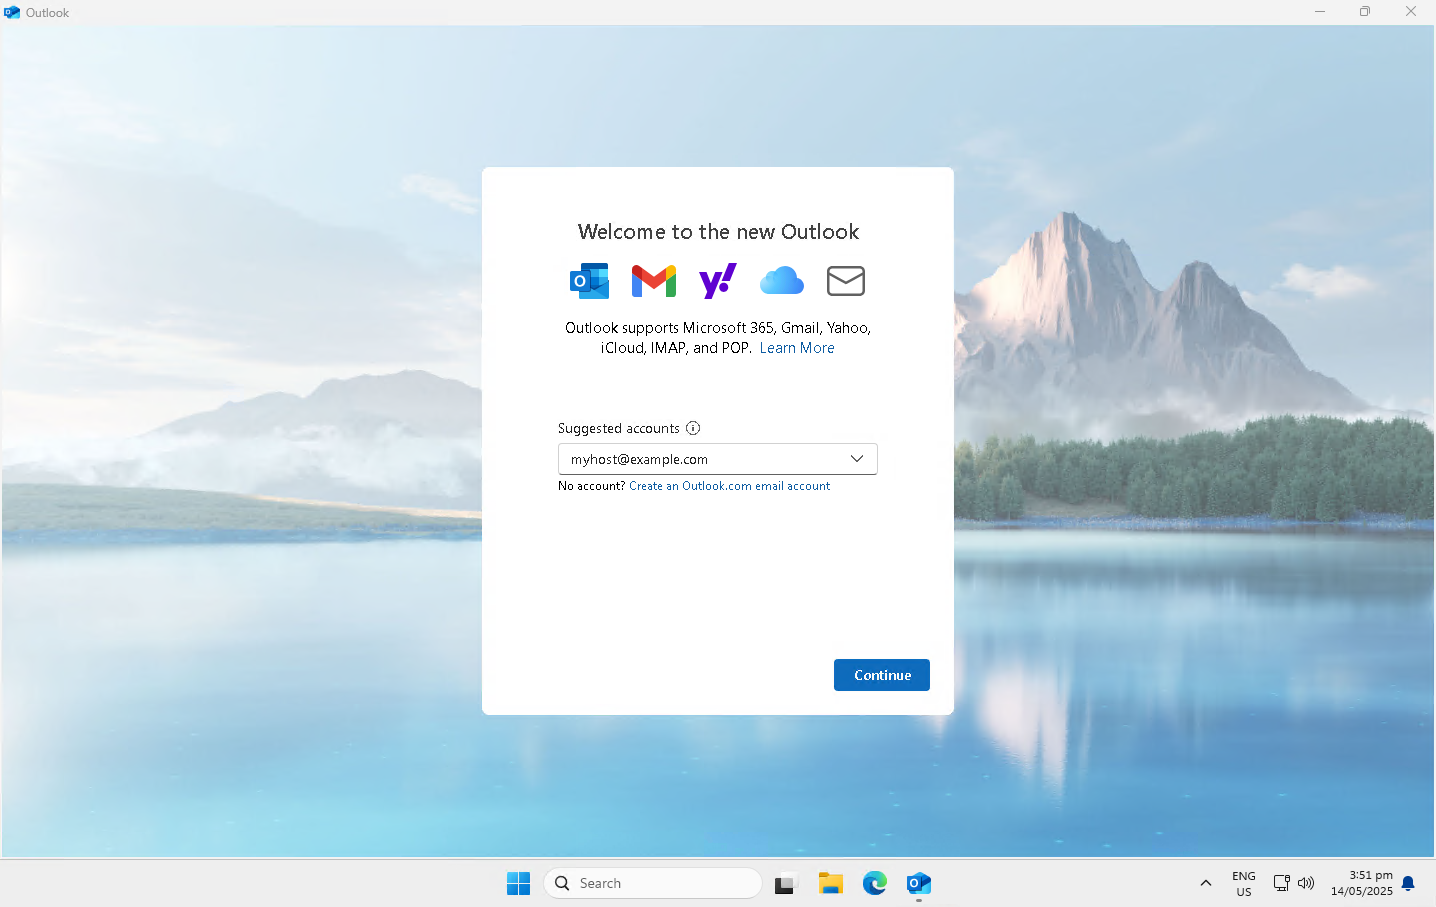
- Enter your email address and click Continue
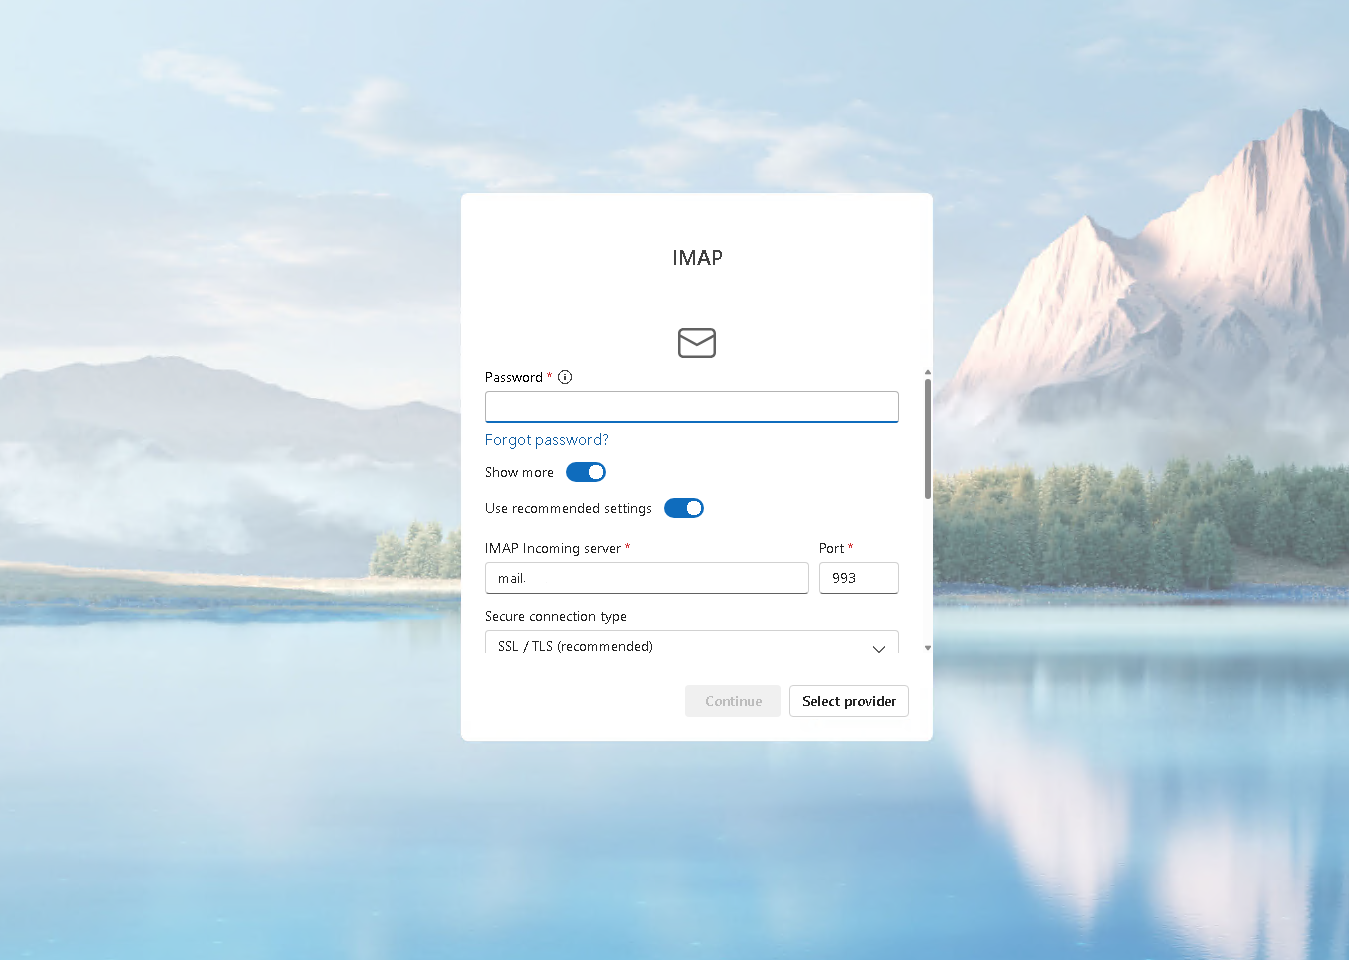
- Enter your password. This is the same password used for webmail. Then, click Show More to verify the following mail settings (you may need to untoggle the Use Recommended Settings option):
- Incoming/Outgoing Server: `mail.yourdomain.co.nz`(make sure you edit this to have your domain)
- Incoming Port: 993
- Outgoing Port: 465
- Encryption Method: SSL/TLS
- SMTP Username: Email Address
- SMTP Password : Use the email account's password
- Click Continue to sync your IMAP with OneDrive
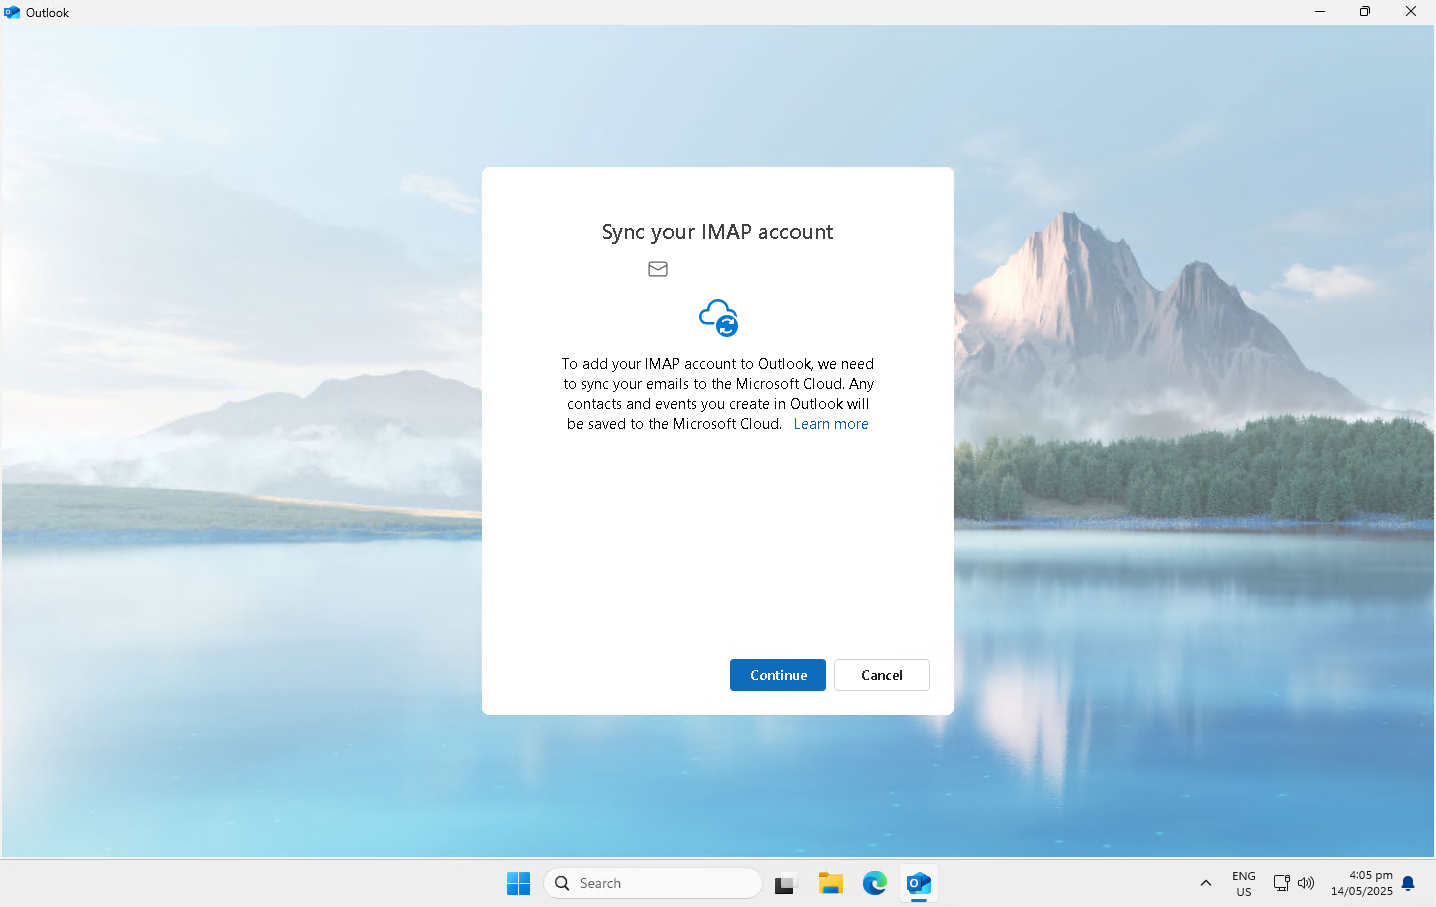
- You should now be finished. Click Done to see your inbox.
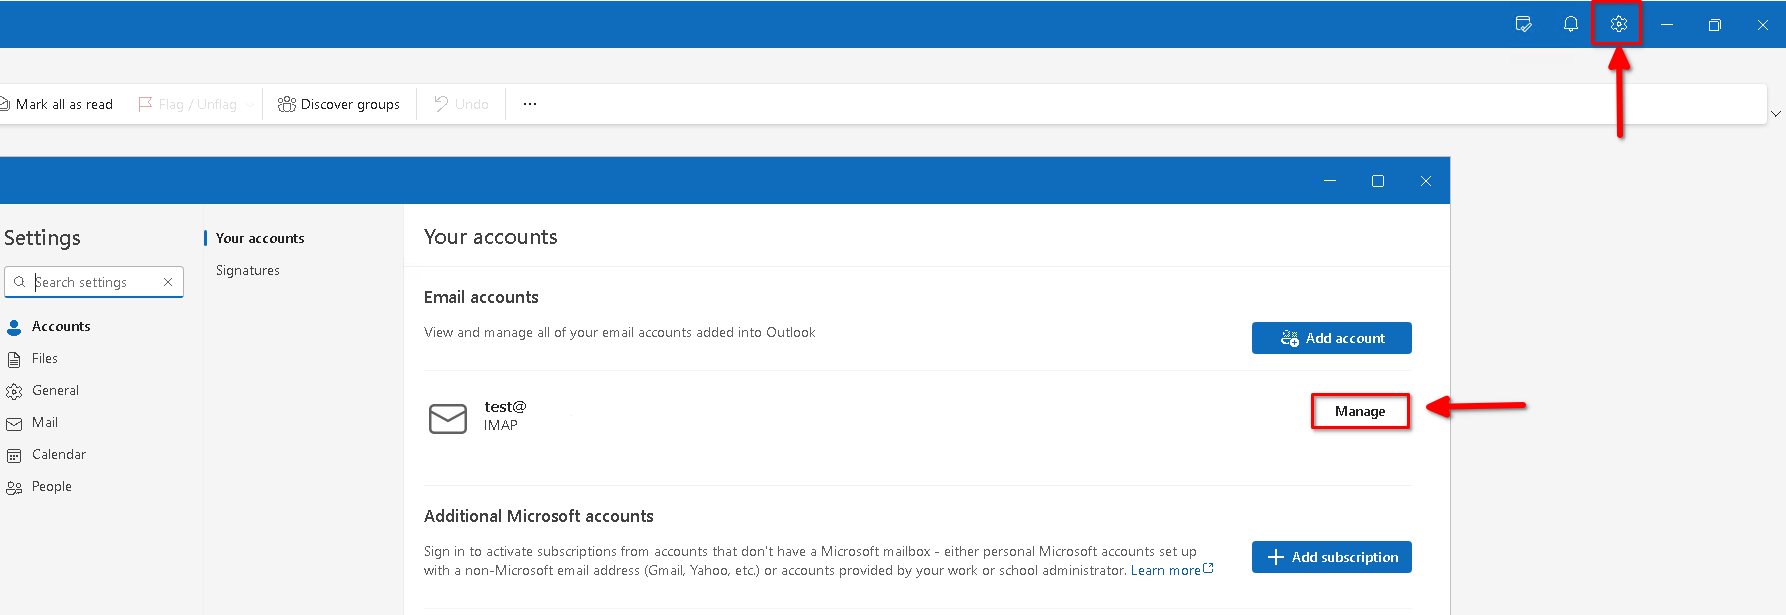
- If you have issues with your email account on new Outlook after the initial setup, click the Settings cog in the top right then under Accounts, click Manage
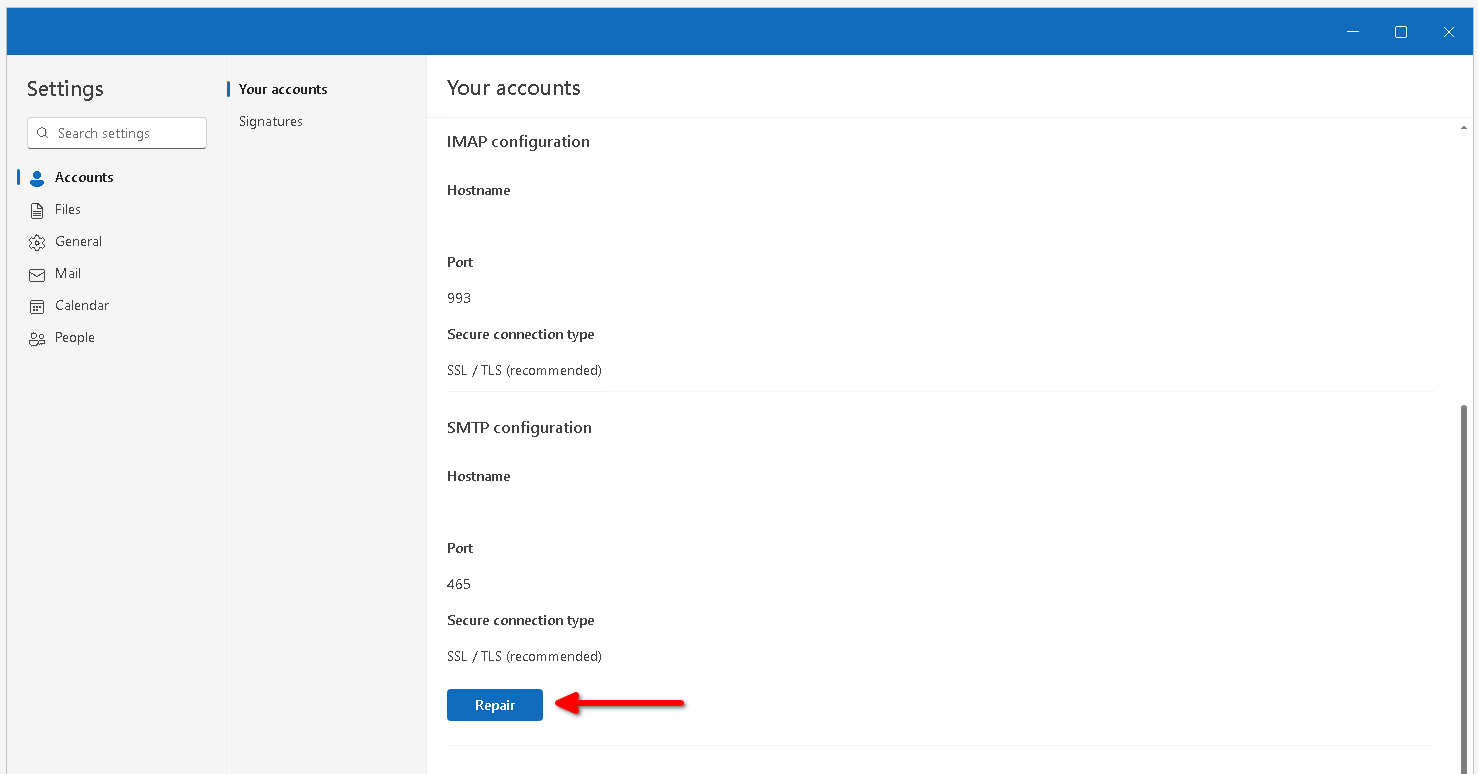
- Click Repair and verify the settings from Step 5
Mac Mail
If you need help setting up your email client, please visit Apple's help for Adding email accounts in Mail on Mac, or contact Apple Support.
If you need to just update your Email Client settings after being migrated to MyHost, skip to step 8.
- Open System Preferences

- Go to Internet Accounts
- Click Add Other Account at the bottom of the page
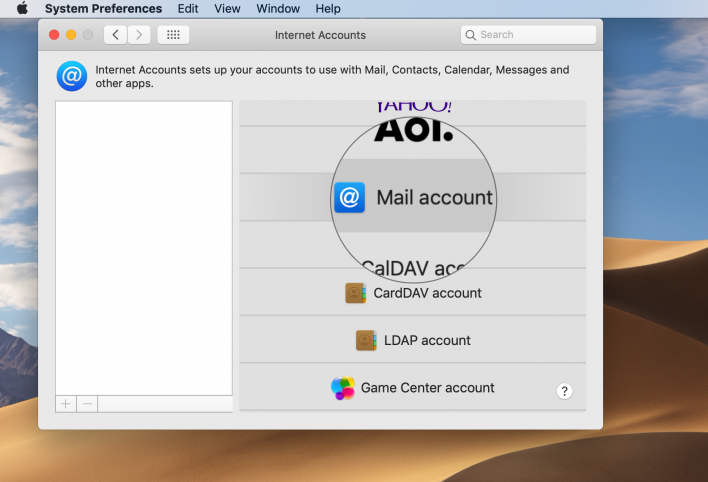
- Select Mail Account and enter in the details:
- Name: The name you would like to be listed when you send emails
- Email Address: Your email address
- Password: The password for your email account
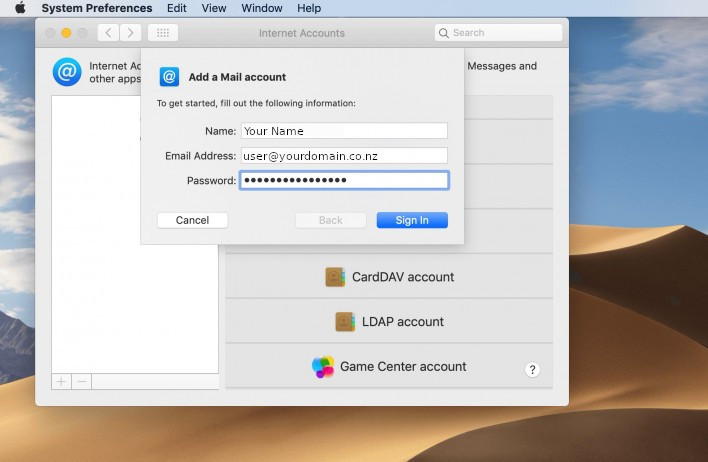
- Click Sign In
- You will be prompted to enter the server settings:
- Account Type: IMAP
- Incoming Mail Server: `mail.yourdomain.co.nz`(make sure you edit this so it contains your actual domain)
- Outgoing Mail Server: `mail.yourdomain.co.nz`(make sure you edit this so it contains your actual domain)
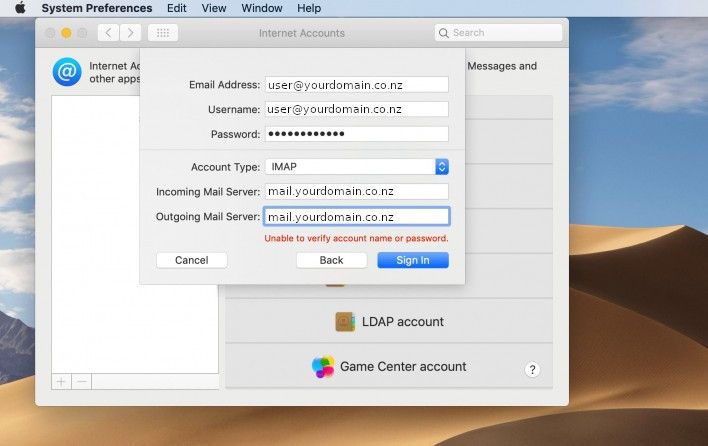
- You will be prompted to enter the server settings:
- Click Sign In.
- To verify that your settings are correct, open the Mail app and go to Preferences
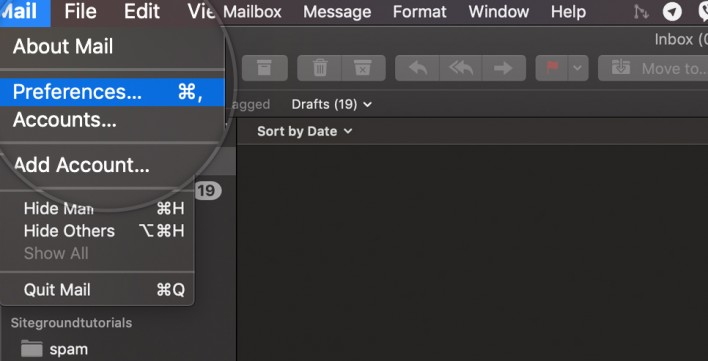
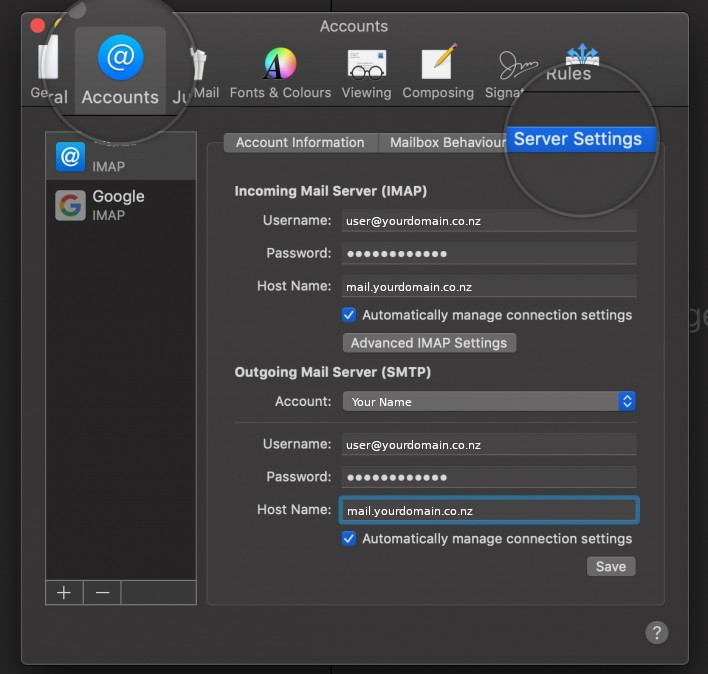
- Click on the Accounts tab, and select your email from the accounts list and click the Server Settings.
- Here you can verify and update your mail client settings.
- Your Hostname for both incoming and outgoing should be: mail.youdomain.co.nz
Thunderbird
If you need help setting up your email client please visit https://wiki.mozilla.org/Thunderbird:Help_Documentation:Managing_Your_Accounts or contact Thunderbird.
- Open the Thunderbird application.
- Go to Tools and click on Accounts Settings.
- Click on the Account Actions button.
- Select Add Mail Account.
- Click Continue.
- Enter your name and email address in the input boxes. This does NOT have to be your username@yourdomain.com. Email addresses such asname@yourdomain.com, webmaster@yourdomain.com, etc. are acceptable as long as they are set up in the hosting control panel.
- Click Continue.
Thunderbird will try to determine your account settings based on the domain portion of your email address (that is, the portion after the "@" symbol). You can either allow the default lookup or click the Stop button to proceed with the Manual Configuration.
Using the Auto-Configuration Option
When using the auto-configuration for account set up, choose whether you would like to use IMAP or POP connections. Click Done when completed.
Thunderbird will take care of the rest!
Using the Manual Configuration Options
- Click the Stop button to stop the auto-configuration feature.
- Edit the Server names and Port to the exact settings desired.
- Select either POP or IMAP - both are supported on our servers. If you plan on setting up your mail on many computers use IMAP.
- POP: Downloads emails to your local computer and removes the copy from the server.
- Good for preventing your inbox from becoming slow or full
- Allows you to view emails offline.
- Since the emails are downloaded and removed from the server, you cannot receive emails on other computers you may have.
- IMAP: Accesses emails only when you are viewing them, always keeping a copy on the server.
- Good for accessing emails from many computers (from the office to your home)
- Requires that you have an internet connection when viewing emails
- Click the Manual Configuration button.
- In the left pane, select Outgoing Server (SMTP) from the bottom of the list.
- Click Add or Edit to make edits to the existing entry, if any.
- Now fill in the following information in the designated fields:
- Description: Enter your email address
- Server Name: Type in your mail server (mail.yourdomain.com)
- Port: You can put 25 or 26. If your isp is blocking port 25, which many do to prevent spam, then choose 26.
- Make sure the checkbox is checked for "User name and password"
- User Name: Type in your full email address. Again, make sure you have created this account in cpanel.
- Make sure that TLS, if available, is selected
- Click OK to finish.
